• Home
  • About
    • Meet Nina
    • Disclosures & Privacy
    • Contact
  • House & Home
    • DIYs
    • Home Decor
    • Holidays
    • Rental Chic
  • Beauty & Style
    • Beauty
    • Style
  • Life & Faith
    • Life
    • Faith
  • Food & Drinks
    • Cocktails
    • Recipes
  • Shop My Instagram
instagram pinterest facebook bloglovin' twitter

Blooming Boldly


Only 5 days till Christmas!! Can you believe it?! I've had this week off work leading up to Christmas, so I've finally gotten a chance to clean our apartment and snap a few photos to share all our decorations this year! Want to take a peek with me?!


The focal point, of course, is the tree. I debated for a long time what colors to incorporate in our Christmas decor and in typical Nina fashion decided on all of them ;) Well not quite all of them, but pink, red, blue, lime green, gold and black and white accents. Logan feels strongly that Christmas = red and green, but since we basically have nothing red or green anywhere else in our home, I wanted something that would go better with our existing decor. 


I bought some striped and some white sparkly ribbon to use as garland, and I love how it turned out! I used solid colored ornaments to pull in the color scheme, and then filled the rest of the tree with our more meaningful ornaments.


Ever since I was a kid, my parents have given us one ornament each Christmas Eve. My mom always tried to find one that related to something we did or an interest we had that last year. I have a whole collection of cute ornaments that represent my different hobbies over the years!


After the tree, I think my most favorite part of every Christmas is the gifts under the tree! I love picking out wrapping paper and all of the trimmings! The best trick I've found over the years is to have at least three different, but coordinating papers. And my favorite thing to use as trimming is tulle! You can get it on a big roll around Christmas time at Hobby Lobby. It's so much cheaper than ribbon, and is a lot easier to work with!


On the coffee table, I have a super simple centerpiece with a big impact! I took a wooden tray from TJ Maxx, put a Bath and Body Works candle in the middle, and filled in the rest with ornaments! Seriously takes 3 minutes to put it all together and I am crazy about how it turned out! With the candle lit, it's just so glowy! 


Next year I think I'll find some Christmas pillows. Don't you think that's just what our couch needs?!


This is the view from "my side" of the couch. I spend a lot of time here in the evenings and weekends! Eating, watching netflix, writing, it all happens right here, so I had to make sure it was festive!


I got these signs from Gordman's for only $10 a piece! And the nutcrackers below were from the Dollar Store - I just gave them a good couple coats of gold to spice them up a bit :)


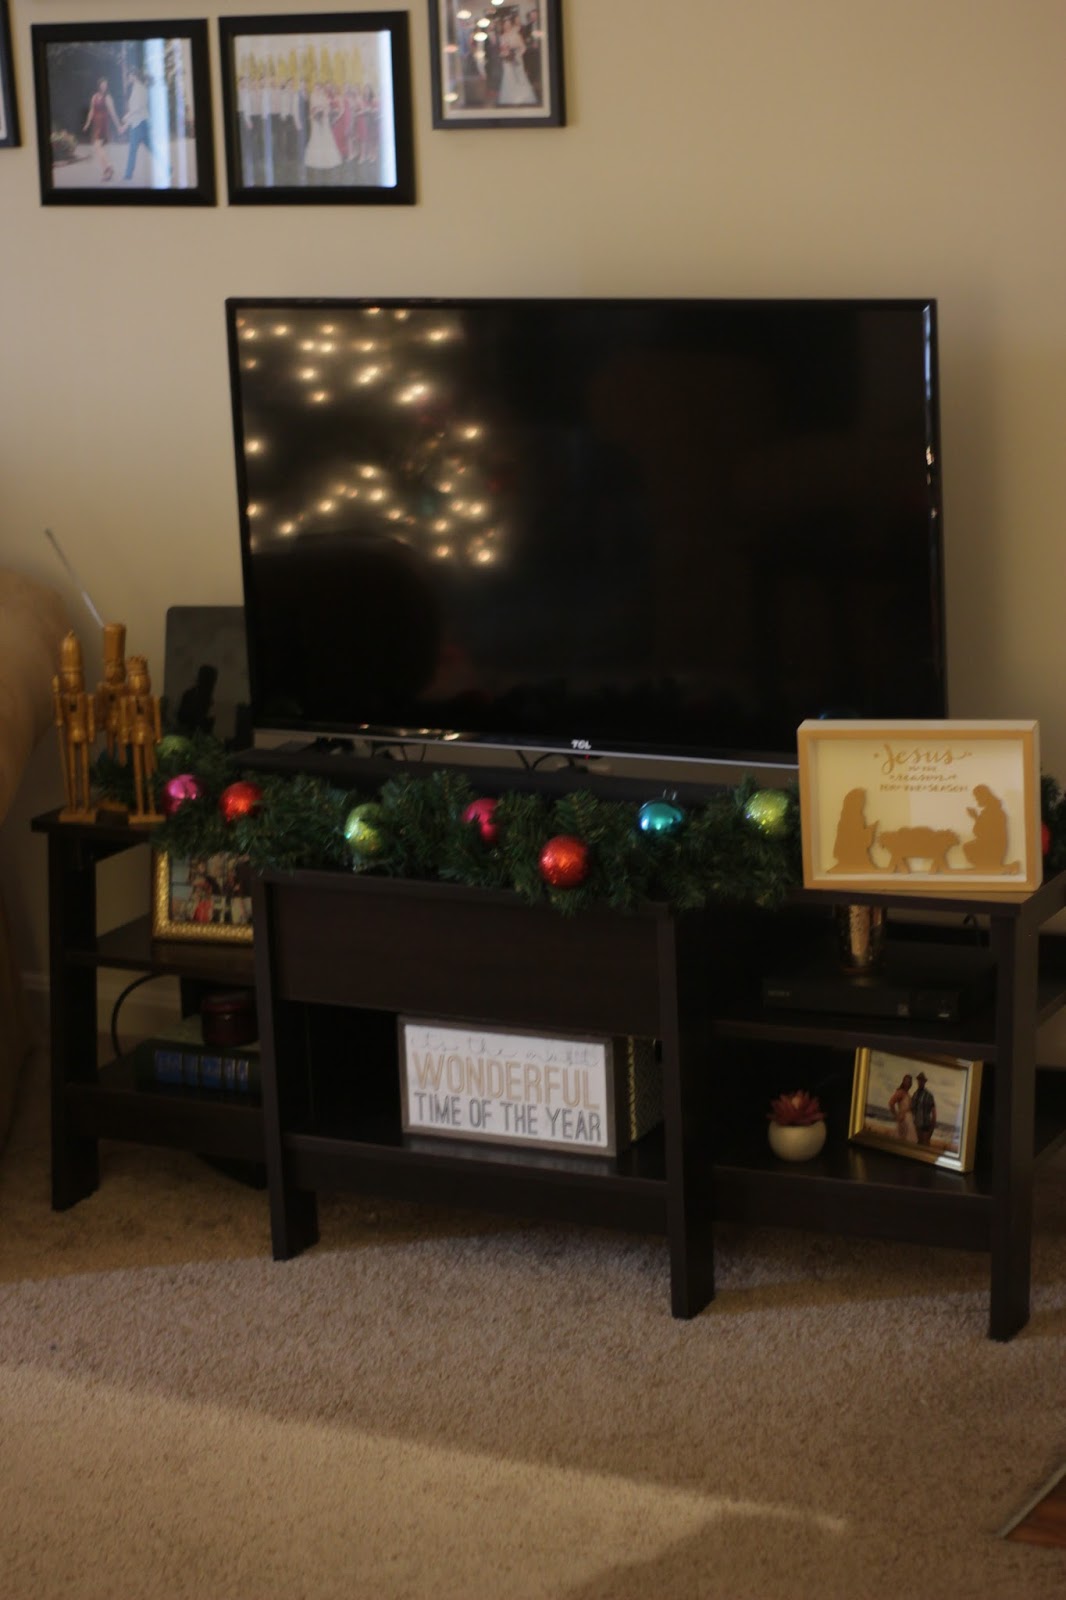
I used some more of the solid colored ornaments on a cheap garland from Hobby Lobby to bring some color over to the TV stand as well!


I use this candle holder year round, but didn't have a candle in a color I liked for Christmas... But I did have extra ornaments on hand (somehow!) and I think it's just adorable!


This candle holder is from the Hearth and Hand line at Target. Most of the Magnolia stuff was a little too rustic for me, but this piece was one I really loved! It transitions so well to a more traditional/contemporary decor theme, and I can't wait to figure out what to fill it with when the holiday season is over!


This white and gold table runner is another peice from Target. I love that it didn't scream "Christmas!" and I could use it year round.


I made this banner with some vinyl and cardstock with the help of my Silhouette Cameo! Isn't it adorable?! I thought "Joy to the World" was perfect for the map! And of course, it needed a little color too :)


I am crazy about our furry stockings! They are so soft and fun! And in case you were wondering, the third is for our fur baby, Zuko. No surprise pregnancy announcement here :P They stockings are from Hobby Lobby, as are the porcelain trees. The sign is from Michaels and the stocking hangers are from Walmart and Target.


I got these trees on a great sale from Hobby Lobby ($20 for all three!) I love how simple and classic they are. I know they're something I will use and love for lots of Christmases (and color schemes) to come!


There it is! Our 2017 Christmas decorations! I am so happy with how they turned out. So cheery and festive and very me! If you missed our front door decorations, be sure to check out my DIY Ornament Wreath Tutorial from last week!


This Christmas season has been so, so sweet so far. Things have been difficult on a lot of fronts lately, and Christmas has given me something happy and fun to focus on during a time I really needed something light. I finished wrapping all our gifts this week and was just admiring them all under our tree. We have so much to be grateful for! So many loved ones, so many presents to give, knowing we'll be getting so many in return. For people who don't live very lavish lives, getting to celebrate Christmas with this much giving and this much love feels so lavish. I feel spoiled already and Christmas hasn't even come yet!


And just one last reminder - if you haven't finished your shopping yet, there's always Amazon Prime! I put together an Amazon Gift Guide for Him and for Her with 100 total ideas, perfect for anyone who may be left on your list! Merry Christmas!

Share
Tweet
Pin
Share
5 comments

I've got another mood board to share today from my Rental Chic Series. This series is all about how I'm making the most of apartment-living and trying to make this rented place feel cozy and personalized without making any major changes like paint, flooring, or fixtures! If you've missed it, I've already shared mood boards for our master bedroom and living room, as well as a few of the projects we've already accomplished!

This one is all about the bathroom, y'all. I don't know what you think of when you hear "rental property bathroom" but what comes to mind for me is cramped and outdated... and our bathroom fits that bill perfectly. Extremely cream, very "meh" flooring, standard oak vanity and basic chrome fixtures. You can tell it's been kept up pretty well. It just lacks absolutely any pizzazz whatsoever! 


If we owned this place, I'd be tiling everything and at the very least painting the vanity, if not replacing it altogether. But sadly, none of that is possible, so it all falls to the decor. It a big job to do, so it's gotta be good!


This post contains affiliate links, meaning I may get a small commission when you click on or make a purchase from one of these links, at no extra cost to you.

The vision for this room all started with a shower curtain that I fell in love with when we were setting up our wedding registry. It felt simple and clean, but the pom poms were a fun and trendy touch! 

link (out of stock in black) | very similar (and cheaper!) | also similar

Then, I found these black and white towels at Target. Have you caught on yet that I have a MAJOR thing for black and white, especially fun black and white geometric patterns? #noshame I loved how the color of these towels matched the shower curtain, but took the boldness level WAY up a notch.

link (out of stock) | similar | also similar

This bathroom was so bland to begin with - I knew it needed some color. As crazy as I am about black and white, even a bold pattern wasn't gonna be enough to really brighten up this cramped room and give it some life! I turned to Pinterest for some inspiration (duh!) and found a few photos that captured the vibe I wanted. I was looking for rooms that brought together the natural, warm wood tones, the contrast of the black and white, and a few pops of color.


One idea I loved right away was a vintage-inspired rug. These are popping up all over the place in home decor lately! I love that they can go with almost any home style and come in so many different colors. I'm a big fan of pattern mixing and a small, intricate design like this is the perfect complement to the large, bold pattern on those towels!


The other component I found I was drawn to was using large photography prints for the art. You can see examples in that last two pins above! I have all sorts of art in our home - personal photos, yarn wall hangings, typography pieces, maps, illustrated canvases. But I don't have any non-personal photographs! I'm digging the idea of using some prints in this room, possibly with a city/urban vibe. But finding art prints can be difficult, especially because I want the art in my home to be significant. I want to feel something when I look at it! Anyone have suggestions of places to look for art prints?

So when you pull all these elements together you get an eclectic, modern, slightly boho bathroom that I seriously love!!

1 | 2 | 3 | 4 | 5 | 6 | 7 | 8 | 9 | 10 | 11


What do you think? Anything I should add or change? I'm still working on pulling this one together, but I'm trying to get it done by the end of the year! Be sure to keep watching my instagram for sneek peeks!

Share
Tweet
Pin
Share
6 comments

Putting together our living room has been a long process! We moved into our apartment a year ago this month and will have been married for a year as of next month! Our living room is where we spend the majority of our time so I knew it had to feel homey, but also a fun reflection of our personalities! I wanted it to be relaxing but also energizing! If you want to read more about that process, you can check out the before photos of our place, take a look at my mood board for this room's design, or see the huge gallery wall I've already shared.A post on all the progress we've made on putting this room together will be coming very soon!

Today, I have one more sneak peek for you before the big reveal! I'm sharing one of my favorite DIY projects I've made for our home so far - this super easy, super colorful Yarn Wall Art piece! It is crazy simple, cost me less than $20, and could easily be accomplished in an afternoon (I, of course, had it strewn around our living room for several weeks, but we don't need to talk about that ;) Anyone else SO good at starting projects but procrastinate the heck out of finishing them?!)


You will need:
  • Several skeins of yarn - how much yarn depends on how big you make your wall hanging and how many colors you want! My finished project is about 18 by 24 inches, and I only used 1/2 - 1/3 of each of these skeins! You can use any weight or type of yarn you like, but I got the cheap stuff from Michael's and it worked just fine
  • A wooden dowel rod - I believe mine was 5/16 inch diameter. It is heavy enough to support the weight of all that yarn, but I was able to cut it in half (slowly) with just a pair of scissors!
  • Scissors
The first thing, and definitely the hardest for me, is to decide on your design! Initially, I was going to have half as many bundles and mix together the light and dark shades in one bunch. But once I started getting to work, I was really digging the more color-blocked look. The possibilities here are truly endless and there's really no wrong way! 

Once you have at least a general idea of what your design will be, you need to get to work on that yarn! I didn't measure very precisely - just used my fully outstretched arms which happened to be about 50 inches. Cutting out the yarn is by far the most time-consuming part of this project, although thankfully it is not very complicated! You can make each of your bundles as thick or thin as you'd like - all of my bundles had 20 pieces of yarn for reference! So I cut 20 strands, each 50 inches long for every knotted bunch on my rod.


Once you have a bunch ready to go, you need to attach them to your rod. Fold your bunch of yarn in half, as evenly as you can. Don't worry if the ends don't line up nicely, you'll trim it later. Place the fold in the middle of the yarn on top of the rod. Put the looped part behind the rod and stick your fingers through the loop to grab the length of the yarn. Pull the ends of the yarn all the way through the loop. 

Pull down until that loop is as tight as possible. I wanted the top yarn on top of my wall hanging to be really flat and even, so I went through and pulled on each individual strand in the bundle to get it as tight as I could. You may not be as obsessive about that as me, but make sure you get it as tight as you want it before you start trimming the ends.


Take a shorter piece of yarn and create a loop on top of the rod so you can hang it up! Just tie the yarn near each end of the rod. 


Then it's time for a haircut! The last step is to trim up the bottom of your wall hanging. It's easiest to go ahead and hang up your piece before you start snipping so that you can tell how it's going to hang. 


And there you have it! Told you it was easy! I love the pop of color and texture it brings to our living room.


Even our sweet boy Zuko approves! He's a tough critic ;)

And just because I'm nice... I'll give you a peek of where this is in context in our living room! Ta daaaa


Like I said, I'll be sharing a full living room reveal here on Blooming Boldly soon! For now, where in your home needs a yarn wall hanging?! This DIY is a too fun and affordable to not try for yourself!


Share
Tweet
Pin
Share
5 comments

Gallery walls... I know, I know. They've been all the Pinterest-rage since like 2011. The chances that there's one somewhere in your home right this moment are extremely high... like I could win money on that! BUT can you ever really have too many gallery walls?!

For me, the hardest part about setting up a gallery wall is deciding on the layout. I am such a visual person that I want to see it all arranged, but if I'm working with more than just a few frames, it's hard to do without putting a boat load of unnecessary holes in my walls. And if I'm starting from scratch, I don't even know how many frames or what sizes I need. Trial and error in that situation can waste a bunch of time AND money!

Finally, I came up with a digital way to see my design before I start banging nails into the wall. I don't even have to know what frames or items I want to use yet! AND I did it using Microsoft Word! No fancy-schmancy design programs necessary! Don't worry, I'll walk you through it step-by-step :)

Designing Your Gallery Wall Layout Digitally


Okay, you want to start by opening up a new document in Microsoft Word. Click Insert on the top menu bar, and then Shape.


When the Shapes menu pops up, click on the rectangle.


If you want to change the color and border of the shape, you can do so using the Fill and Line options on the left of the menu. But that's optional!


The most important part is the size! You need to uncheck the box on the far right first. Then, type in the Height and Width of a standard frame size, or an item you know you want to use. I took the dimensions in inches and basically moved the decimal point over... so an 8x10 frame would be 0.8x1.0, and a 4x6 would be 0.4x0.6.

I knew I wanted to incorporate our canvas "guest book" that we had guests sign at our Wedding, so I started with a rectangle for it. It's about 20x24, so I made a 2x2.4 inch rectangle first.


Keep making rectangles and playing with the arrangement. If you know already there are certain pieces you want to incorporate, then make sure you add shapes for them! And if you're starting from scratch, you'll want to stick to easy to find frame sizes. 4x6, 5x7, 8x10, 11x14, you know the drill. Or you can look on Amazon.

Play around until you find a few you like! Do you like symmetrical or asymmetrical? Close together or more space in-between? It's so much easier to figure out when you can see the layout all together, with the correct ratios, instead of just trying to picture it in your head!


 Once you find a few arrangements, it's time to take it to your wall! No holes required!

Testing Your Layout on the Wall

Seeing your design on a computer screen is HUGELY helpful, but sometimes it's still not quite enough. Even if you buy all the frames and lay them out on your floor, you still can't look at it from the proper perspective unless you stand on something tall! The best way to envision how it will look on your wall is to see it on your wall!


Start by cutting wrapping paper rectangles for each frame in your arrangement. This is a great way to get rid of old Christmas wrapping paper you know you won't want to use next holiday season! Or, if you don't have any on hand, you can get a roll from the Dollar Store for a buck :)

If you have any frames on hand, even if you don't plan on using them in your collage, you can trace them on the paper. Or you can use your handy dandy ruler :)
I don't worry about making them perfect. I won't be using them for actually measuring or hanging the frames. It's just to get an idea of how it looks in your space!


Once you've got all your frames cut out, it's time to get 'em on the wall! You can be as precise as you want. I measured to find the middle of my wall, folded my center frame in half, and placed the fold-line on the center-line of the wall. After that, I just eyeballed it! 

I highly suggest you use painter's tape to hang your paper frames! Scotch tape can often leave marks on your paint, and since you're just testing out layouts, they may not be hidden by the frames in the final arrangement!


After everything is hung, take a step back and check it out! Need to make any adjustments? Want to try out another layout? Keep playing until you love it!

Hanging Your Gallery Wall

Now for the part that has always caused me the most headache... actually hanging things on the wall. I'm an exceptionally good eyeball-er. If it's totally abstract and asymmetrical, like the gallery walls I often put together in college, I would put it up without even breaking out a measuring tape. But when I want something with cleaner lines, it takes some more work to get everything hung properly.

So the first step is to find the middle line of the wall or area where you're hanging your collage. What's awesome about having a wall covered in paper is that you can write all over it! Start with one of your center pieces and draw the mid-line all the way down it. You'll hang this one first.

Look at the back of that item. Measure how far it is from the top of the item to the top of whatever mechanism you hang it by (just part of the wooden frame like this canvas, a hook, a string, etc). This one was 1.5 inches from the top of the canvas. 

On your paper template, measure down that far on the midline. So I went down 1.5 inches from the top of the paper, following the mid-line I had drawn. That's where the nail goes! Carefully take the paper down, tearing it around the nail, and you're good to go!


Level up that first piece, and then you can use it as a basis for all your next measurements. Whenever you line up the next frame, it's easiest if the edge or center aligns with a frame that's already hanging. Make sure you take into account the distance you want between the frames, and the distance over and/or up to the hook.  

It gets easier the more frames you hang, because you have more points you can measure from! You know the old saying "measure twice, cut once"... the same goes for banging nails in the wall! I always recommend double checking your measurements unless you want to re-do a few of those nails.


I always use a level to make sure all my lines are parallel. If your frames won't stay level, you can use a very, very small amount of sticky tack, a good size roll of painter's tape, or a small sliver of a command strip to keep it in place!


These are all my best tips for pain-free gallery wall hanging! Chances are you've hung one before, but I hope you learned at least one new trick that will make your next one a breeze! Tell me in the comments something you didn't know before!

P.S. Who can guess how much I spent on this gallery wall in our living room??? Also, did you catch that this is a preview of our living room progress?! If you didn't see my inspiration and planning process, be sure to check out my recent Mid Century + Tribal Living Room Inspiration post! And stay tuned for a post coming soon on the progress I've made in reaching my initial inspiration! I'll share lots of pictures plus how much it cost to put this gallery wall together (hint: it's way less than you think!)


Share
Tweet
Pin
Share
9 comments
Older Posts

Meet Nina

Meet Nina
Hey, I'm Nina! I'm a newlywed, Kentucky girl with a love for bright colors, a good DIY project, finding a bargain and making the most out of life!
Read More

Follow

  • Instagram
  • pinterest
  • facebook
  • bloglovin
  • twitter

Never Miss An Update

* indicates required

Looking for Something?

Categories

Beauty Beauty & Style Beauty Reviews Christmas Cocktails DIY Drugstore Beauty Essie Gel Setter Faith Faves Under $50 Food & Drink Gallery Walls Gift Guides Giveaway God's Promises Holidays Home Decor House & Home Kentucky Proud Life Life & Faith Marriage Meals Monday Motivation Mood Boards Nails Product Reviews Productivity Recipes Rental Chic Round Ups Style Style Guides Wedding

Pinterest

Popular Posts

  • LimeLight by Alcone Product Review
    LimeLight by Alcone Product Review
    Who else loves trying new makeup and skin care?? I have such a BAD habit of buying new products just for the sake of trying them. I may h...
  • How to Design the Perfect Gallery Wall on the First Try (Using Microsoft Word so Anyone Can Do It!)
    How to Design the Perfect Gallery Wall on the First Try (Using Microsoft Word so Anyone Can Do It!)
    Gallery walls... I know, I know. They've been all the Pinterest-rage since like 2011. The chances that there's one somewhere in ...
  • Monday Motivation (+ a GIVEAWAY!): It Does Not Matter How Slowly You Go As Long As You Do Not Stop
    Monday Motivation (+ a GIVEAWAY!): It Does Not Matter How Slowly You Go As Long As You Do Not Stop
    Happy Monday, y'all! Who else needs a little extra motivation to make it through today?? Hard for me to say put that "happy...
  • 5 Ways to Remember God's Promises When Life Gets Hard + A Worship Spotify Playlist
    5 Ways to Remember God's Promises When Life Gets Hard + A Worship Spotify Playlist
    How's your memory? Mine's not good. At all. It's kind of ridiculous sometimes. I remember people and faces exceptionally w...
  • DIY Christmas Ornament Wreath
    DIY Christmas Ornament Wreath
    Are you all feelin' the Christmas spirit yet?! I am ALL about it! I've spent this weekend decorating, shopping, drinking hot cho...

Created with by ThemeXpose