
How to Design the Perfect Gallery Wall on the First Try (Using Microsoft Word so Anyone Can Do It!)

For me, the hardest part about setting up a gallery wall is deciding on the layout. I am such a visual person that I want to see it all arranged, but if I'm working with more than just a few frames, it's hard to do without putting a boat load of unnecessary holes in my walls. And if I'm starting from scratch, I don't even know how many frames or what sizes I need. Trial and error in that situation can waste a bunch of time AND money!
Finally, I came up with a digital way to see my design before I start banging nails into the wall. I don't even have to know what frames or items I want to use yet! AND I did it using Microsoft Word! No fancy-schmancy design programs necessary! Don't worry, I'll walk you through it step-by-step :)
Designing Your Gallery Wall Layout Digitally
Okay, you want to start by opening up a new document in Microsoft Word. Click Insert on the top menu bar, and then Shape.

When the Shapes menu pops up, click on the rectangle.

If you want to change the color and border of the shape, you can do so using the Fill and Line options on the left of the menu. But that's optional!
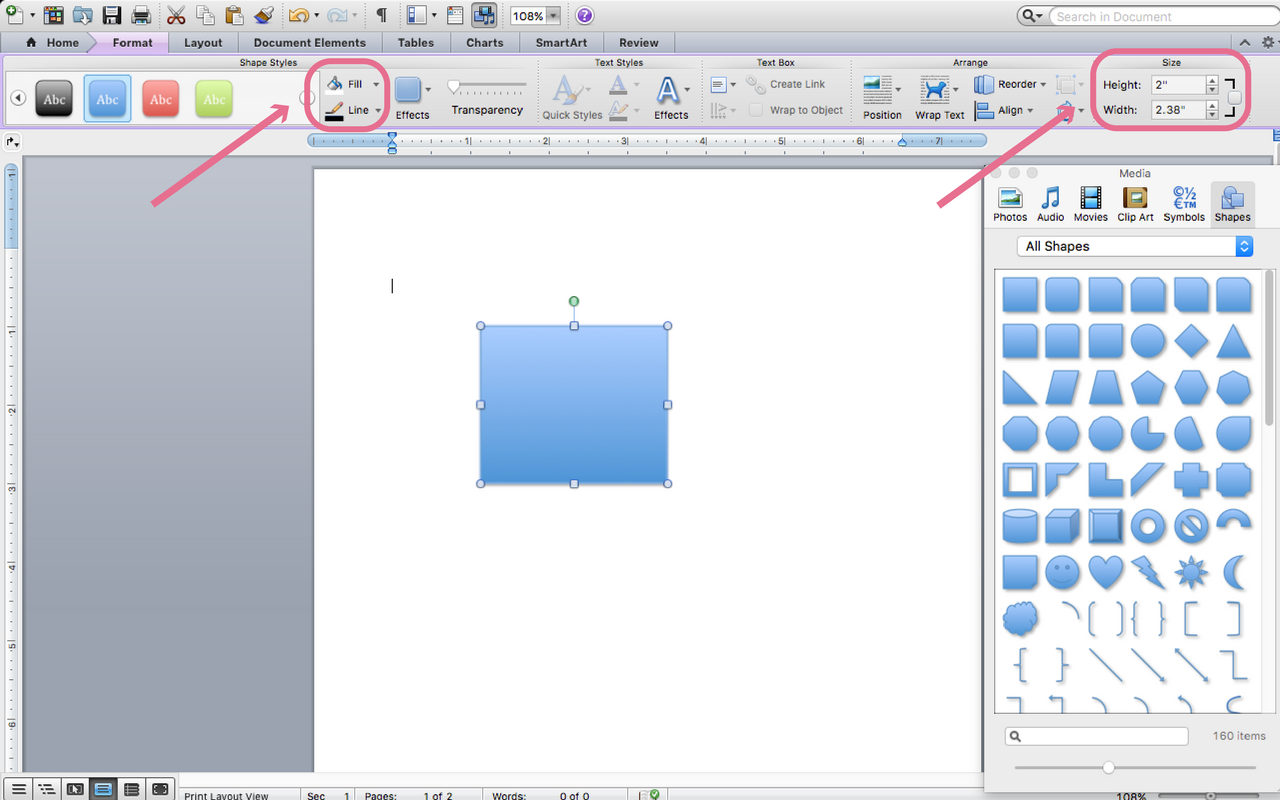
The most important part is the size! You need to uncheck the box on the far right first. Then, type in the Height and Width of a standard frame size, or an item you know you want to use. I took the dimensions in inches and basically moved the decimal point over... so an 8x10 frame would be 0.8x1.0, and a 4x6 would be 0.4x0.6.
I knew I wanted to incorporate our canvas "guest book" that we had guests sign at our Wedding, so I started with a rectangle for it. It's about 20x24, so I made a 2x2.4 inch rectangle first.

Keep making rectangles and playing with the arrangement. If you know already there are certain pieces you want to incorporate, then make sure you add shapes for them! And if you're starting from scratch, you'll want to stick to easy to find frame sizes. 4x6, 5x7, 8x10, 11x14, you know the drill. Or you can look on Amazon.
Play around until you find a few you like! Do you like symmetrical or asymmetrical? Close together or more space in-between? It's so much easier to figure out when you can see the layout all together, with the correct ratios, instead of just trying to picture it in your head!

Once you find a few arrangements, it's time to take it to your wall! No holes required!
Testing Your Layout on the Wall
Seeing your design on a computer screen is HUGELY helpful, but sometimes it's still not quite enough. Even if you buy all the frames and lay them out on your floor, you still can't look at it from the proper perspective unless you stand on something tall! The best way to envision how it will look on your wall is to see it on your wall!

Start by cutting wrapping paper rectangles for each frame in your arrangement. This is a great way to get rid of old Christmas wrapping paper you know you won't want to use next holiday season! Or, if you don't have any on hand, you can get a roll from the Dollar Store for a buck :)
I don't worry about making them perfect. I won't be using them for actually measuring or hanging the frames. It's just to get an idea of how it looks in your space!

Once you've got all your frames cut out, it's time to get 'em on the wall! You can be as precise as you want. I measured to find the middle of my wall, folded my center frame in half, and placed the fold-line on the center-line of the wall. After that, I just eyeballed it!
I highly suggest you use painter's tape to hang your paper frames! Scotch tape can often leave marks on your paint, and since you're just testing out layouts, they may not be hidden by the frames in the final arrangement!

After everything is hung, take a step back and check it out! Need to make any adjustments? Want to try out another layout? Keep playing until you love it!
Hanging Your Gallery Wall
Now for the part that has always caused me the most headache... actually hanging things on the wall. I'm an exceptionally good eyeball-er. If it's totally abstract and asymmetrical, like the gallery walls I often put together in college, I would put it up without even breaking out a measuring tape. But when I want something with cleaner lines, it takes some more work to get everything hung properly.

So the first step is to find the middle line of the wall or area where you're hanging your collage. What's awesome about having a wall covered in paper is that you can write all over it! Start with one of your center pieces and draw the mid-line all the way down it. You'll hang this one first.
Look at the back of that item. Measure how far it is from the top of the item to the top of whatever mechanism you hang it by (just part of the wooden frame like this canvas, a hook, a string, etc). This one was 1.5 inches from the top of the canvas.
On your paper template, measure down that far on the midline. So I went down 1.5 inches from the top of the paper, following the mid-line I had drawn. That's where the nail goes! Carefully take the paper down, tearing it around the nail, and you're good to go!

Level up that first piece, and then you can use it as a basis for all your next measurements. Whenever you line up the next frame, it's easiest if the edge or center aligns with a frame that's already hanging. Make sure you take into account the distance you want between the frames, and the distance over and/or up to the hook.
It gets easier the more frames you hang, because you have more points you can measure from! You know the old saying "measure twice, cut once"... the same goes for banging nails in the wall! I always recommend double checking your measurements unless you want to re-do a few of those nails.

I always use a level to make sure all my lines are parallel. If your frames won't stay level, you can use a very, very small amount of sticky tack, a good size roll of painter's tape, or a small sliver of a command strip to keep it in place!

These are all my best tips for pain-free gallery wall hanging! Chances are you've hung one before, but I hope you learned at least one new trick that will make your next one a breeze! Tell me in the comments something you didn't know before!

P.S. Who can guess how much I spent on this gallery wall in our living room??? Also, did you catch that this is a preview of our living room progress?! If you didn't see my inspiration and planning process, be sure to check out my recent Mid Century + Tribal Living Room Inspiration post! And stay tuned for a post coming soon on the progress I've made in reaching my initial inspiration! I'll share lots of pictures plus how much it cost to put this gallery wall together (hint: it's way less than you think!)


9 comments
This is awesome!!! And it looks great! My friend did this very thing when she did a gallery wall and I was so impressed with the details of getting it all right but it worked so well. <3
ReplyDeleteThank you!! I love it :) And that's so fun! I've never met anyone else who does it this way!
DeleteThese are such great tips! I love gallery walls. I have a few in my home. I never thought about mapping it out on the computer first. Such a great idea.
ReplyDeleteThank you! I hadn't come across anyone else who mapped them out first, so I thought I might as well share! :)
DeleteThis is a great idea! I never thought to use paper to visualize the layout before making a mess of my walls.
ReplyDeleteIt's so easy too! We're in a rental right now, so not making a mess of the walls is a huge priority!! :)
DeleteWhat a great post! Gallery walls are so hard to do and mine tend to get off-centered! Thank you for sharing these tips! I will definitely follow them when I hang up my next gallery wall!
ReplyDeleteI literally just created a gallery wall!!!! Well, i directed my husband where to put the frames lol!!!!
ReplyDeleteOmg you're a genius. This is amazing and such a good idea! Also what an adorable end result! Can't wait to try this. I am the actual worst at trying to hang photos!
ReplyDelete